Hello everybody, welcome to our recipe page, if you're looking for Vickys Great White Shark Cake recipe, look no further! We provide you only the perfect Vickys Great White Shark Cake recipe here. We also have wide variety of recipes to try.
Before you jump to Vickys Great White Shark Cake recipe, you may want to read this short interesting healthy tips about Turn to Food to Improve Your Mood.
A lot of us have been conditioned to believe that comfort foods are not good and should be avoided. However, if your comfort food is candy or junk food this holds true. Other times, however, comfort foods can be completely healthy and it's good for you to eat them. There are a number of foods that, when you eat them, may boost your mood. If you seem to feel a little bit down and you're in need of a happiness pick me up, try a few of these.
Cold water fish are excellent for eating if you wish to combat depression. Salmon, herring, tuna, mackerel, trout, and so on, they're all chock-full of omega-3 fatty acids and DHA. These are two substances that boost the quality and function of the gray matter in your brain. It's true: eating a tuna fish sandwich can seriously boost your mood.
See, you don't need to stuff your face with junk food when you are wanting to feel better! Try several of these instead!
We hope you got insight from reading it, now let's go back to vickys great white shark cake recipe. You can cook vickys great white shark cake using 7 ingredients and 43 steps. Here is how you achieve it.
The ingredients needed to prepare Vickys Great White Shark Cake:
- You need 1 of x 6"x 3" deep round cake tin.
- Take 1 of x 1 litre ovenproof pudding basin.
- Prepare 2 of x mix for 6" round cake*.
- Provide 450 g of buttercream, enough to lightly skim and then fill 2 x 6" cakes.
- Take 650 g of fondant / ready roll icing in white.
- Take of gel food colouring in black, red and pale pink / flesh toned.
- Provide of cocktail skewers.
Steps to make Vickys Great White Shark Cake:
- You can use any cake recipe you like. Most cake recipes are for an 8"layer. This is absolutely fine. Don't scale them down. Just use your leftover batter to make a couple of cupcakes. I have used my single Banana Loaf recipe for this at my sons request as it's for his birthday. You can of course use an 8" tin and 1.5 litre pudding basin instead but I feel that the 6" is a nice size and the finished cake will feed 16 - 18 people.
- Do one cake at a time because they use different oven temperatures.
- Starting with the sharks head, preheat the oven to gas 3 / 160C / 325F and grease the pudding basin well with some extra margarine. Cut a circle of baking paper for the flat part on the bottom of the bowl and put it in.
- Make up your cake batter. You need enough batter to fill 1 x 6" round cake tin or a loaf tin. This is around 2.5 - 3 cups or 900g - 1000g worth of batter. Enough to fill the pudding basin 3/4 full. (I put my whole loaf tin recipe in but I don't use eggs so that will make a difference. If you use eggs in your batter try using the lesser amount first).
- Put in the oven for 75 - 90 minutes. A toothpick test will show when it's ready. Don't be tempted to open the oven door before the 75 minute mark and be sure to bake the basin on top of an oven tray in case the batter overflows.
- While the cake is baking, roll 30g (smaller than golf ball size) of the white fondant out around 3mm thick onto a surface lightly dusted with icing sugar.
- Cut into strips then cut the strips into triangles. Set aside to dry and harden until the rest of the recipe is completed.
- Dye 30g more white fondant with a touch of pink or flesh coloured dye and knead in well. Split into 3 balls.
- Take one ball and roll it into a short sausage shape, pinching it a little from the end. This is going to be an arm. The pinched part is the wrist and the fatter ball part behind it will be the hand. Roll the rest of the arm between your fingers to lengthen it.
- Cut a thumb with a sharp knife and ease away from the hand a little.
- Now divide the rest of the hand into 4 fingers.
- Flip over and stroke with your finger gently to make a palm and splay the fingers out a little so you can neaten them up. Very gently smooth and round them with your finger.
- Now take one of the remaining balls and make a slightly longer sausage shape. Bend it round your finger to make the ankle and foot and using your other hand, stroke the sole of the foot to shape it.
- Same as before, use your knife to cut the big toe, then divide the rest of the foot into 4.
- Repeat with the final ball of fondant then insert a cocktail stick halfway down from the shoulder of the arm and knees of the legs and set aside with the teeth to dry.
- When the basin cake is almost ready to come out of the oven mix up your batter for the 6" round tin. Same amount of batter required.
- When the pudding basin cake comes out of the oven it should be well risen.
- Turn the heat up to gas 4 / 180C / 350F and put the cake tin in for 60 - 75 minutes or until a toothpick inserted comes out clean. Check after an hour and if the top is browning but the cake is still a bit jiggly, put a square of foil over the top and give it another 15 minutes.
- To release the pudding basin cake, run a knife around the edge of the bowl as you would normally do for a cake tin and gently turn the cake out onto a wire rack. If it doesn't rise to meet the top of the bowl dont worry. It's the shape guide we need more than anything.
- Do the same when the cake tin cake is done.
- When both cakes have cooled completely you need to level them off. Take a sharp knife and slide it across the top of the cake tin cake and across the wide end of the pudding basin cake. Keep your offcuts, we'll need them later.
- Trim your cake tin cake so it fits the basin cake. My tin was half a cm more in diameter than the widest part of my pudding basin. Again, keep the offcuts.
- Get a cake board ready. I used a blue one. Cut squares of baking paper up and arrange them like this around the board. It will protect the board from the buttercream and your knife when we come to decorate the cake.
- Put the cake tin cake on top of the lined board and set aside.
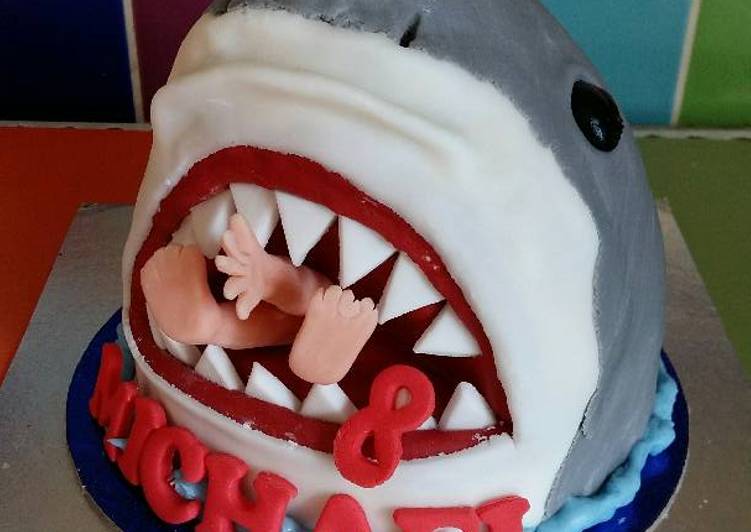
- You need to carve out the sharks mouth from the basin cake. Take a sharp knife and cut an arc shape like this from the wide bottom edge. Around 5 inches wide and at the centre point of those, about 3 inches tall.
- Carve in about 2 inches at the bottom tapering back up to meet the top outside edge by holding the knife at an angle towards you at the top when cutting..
- Now we totally ruin the basin cake lol. Cut it in 2 equally deep layers and sandwich it back together with some buttercream.
- Put some buttercream on top of the cake tin cake and sandwich the basin cake on top so now we have a 3 layer cake.
- Now crumb up all your cake offcuts and add just enough buttercream to them to hold them together, just like making cakepops. We'll use this crumb mixture to build up the flat part on the top of the sharks head to make the pointy snout and any bits that need patching up. You need less buttercream than you think so add a teaspoon at a time. Build up a layer as deep as each of your other layers of cake.
- Side view so far.
- Cover the whole cake in a thin layer of plain white buttercream. This is just to give the fondant a smooth surface to cling to. Once you've done the buttercream coating and smoothed it down, put the cake in the fridge for an hour to set.
- Smooth a fresh layer of buttercream over the cake to give the fondant a good base to stick to.
- The shark head is a bit fiddly to decorate. The back, sides and top of the snout are grey, the rest is white but inside the mouth is red. Just follow my pictures. Colour 350g of the white fondant grey using some of your black gel dye then colour 100g of the white that's left with the red. Roll out each around 3mm thick.
- Do the red mouth first. Cut a large oval and trim it to fit once you place it over the mouth area.
- It's easiest to stick it on first then cut away the excess with a sharp knife. Smooth it into place with the back of a tablespoon.
- Then the white underside. Roll out and lay over like this the front of the cake like this so it covers halfway up the snout and a third of the way round the sides.
- Then cut around the mouth. It goes beneath the open jaw too. Pull it down from the snout to make a crinkle or two. Sharks skin crinkles when they bare their teeth!.
- Then the grey. Roll out a large shape twice as wide as it is high and smooth down. Pull the edge that meets the white instead of using the knife to trim it so it's not an even shape. It looks more natural that way. Smooth it onto the white a little and wet with some water to help it stick down. Cut off the excess that meets the cake board then remove the paper squares from underneath.
- Colour the grey offcut fondant black and roll into 2 balls, then flatten into discs. Wet on the back a little to help them stick on then press into each side of the head just above where the top of the mouth is. You can pipe black icing on if you'd rather. Use a skewer to make 2 nostrils on the snout.
- Use a knife to cut through to the buttercream layer on the inside of the gumline. Add the teeth......
- ...all the teeth!.
- Add the swimmers limbs by sticking the visible end of the cocktail sticks right into the cake as far as they'll go and you're done! I went on to pipe a little blue buttercream around the bottom of the shark as I has my sons name to stick on to the cake.
- Happy 8th Birthday Michael!.
If you find this Vickys Great White Shark Cake recipe helpful please share it to your good friends or family, thank you and good luck.